
LXD + Ubuntu + Wordpressで家庭内ブログサーバを構築してみた
自宅のLXD上のUbuntu 18.04コンテナにWordPressをインストールし、家庭内ブログサーバを構築しましたので、その手順を残したいと思います。
Noteこの記事ではrootユーザーでログインして作業を行っています。プロンプトが#の場合はrootユーザーで実行することを示しています。
LXDコンテナの準備
LXDにUbuntuのコンテナを用意します。今回使用したバージョンは18.04です。
関連XubuntuサーバにLXD環境を構築する手順は以下の記事に書いています。
古いCeleron MノートでLinuxコンテナ(LXD)を構築してみた
コンテナの作成
ubuntu18という名前のUbuntu 18.04コンテナを作成します。
# lxc launch images:ubuntu/18.04 ubuntu18ubuntu18が開始され、IPアドレスが振られていることが確認できます。
# lxc list
+---------------+---------+-----------------------+------+------------+-----------+
|     NAME      |  STATE  |         IPV4          | IPV6 |    TYPE    | SNAPSHOTS |
+---------------+---------+-----------------------+------+------------+-----------+
| centos6       | RUNNING | 10.188.125.220 (eth0) |      | PERSISTENT | 0         |
+---------------+---------+-----------------------+------+------------+-----------+
| debian11      | RUNNING | 10.188.125.180 (eth0) |      | PERSISTENT | 0         |
+---------------+---------+-----------------------+------+------------+-----------+
| ubuntu18      | RUNNING | 10.188.125.68 (eth0)  |      | PERSISTENT | 0         |
+---------------+---------+-----------------------+------+------------+-----------+
| ubuntumacvlan | STOPPED |                       |      | PERSISTENT | 0         |
+---------------+---------+-----------------------+------+------------+-----------+
コンテナに接続
ubuntu18コンテナに接続します。以降、ubuntu18コンテナ上での作業となります。
# lxc exec ubuntu18 -- bashMySQLサーバの準備
MySQLのインストール
mysql-serverとmysql-clientをインストールします。
# apt install mysql-server mysql-clientMySQLが起動していることを確認します。
# systemctl status mysql
● mysql.service - MySQL Community Server
   Loaded: loaded (/lib/systemd/system/mysql.service; enabled; vendor preset: enabled)
   Active: active (running) since Sat 2020-09-26 00:49:52 UTC; 1min 52s ago
 Main PID: 4541 (mysqld)
    Tasks: 27 (limit: 4125)
   CGroup: /system.slice/mysql.service
           └─4541 /usr/sbin/mysqld --daemonize --pid-file=/run/mysqld/mysqld.pid

Sep 26 00:49:50 ubuntu18 systemd[1]: Starting MySQL Community Server...
Sep 26 00:49:52 ubuntu18 systemd[1]: Started MySQL Community Server.
Sep 26 00:49:55 ubuntu18 systemd[1]: mysql.service: Failed to reset devices.list: Operation not permitted
WordPress用データベースを作成
rootユーザーでMySQLに接続します。
# mysql -u root -p今回は分かりやすくwordpressという名前のデータベースを作成します。
mysql> CREATE DATABASE wordpress;mysql> show databases;
+--------------------+
| Database |
+--------------------+
| information_schema |
| mysql |
| performance_schema |
| sys |
| wordpress |
+--------------------+
5 rows in set (0.00 sec)WordPress用のユーザーとしてwordpressを作成します。パスワードもwordpressにします。
mysql> CREATE USER 'wordpress' IDENTIFIED BY 'wordpress';wordpressユーザーにwordpressデータベースへのフルアクセス権限を与えます。
mysql> GRANT ALL PRIVILEGES ON wordpress.* TO 'wordpress';wordpressデータベース対してフルアクセス権限が付与されていることが確認できます。
mysql> SHOW GRANTS FOR wordpress;
+----------------------------------------------------------+
| Grants for wordpress@%                                   |
+----------------------------------------------------------+
| GRANT USAGE ON *.* TO 'wordpress'@'%'                    |
| GRANT ALL PRIVILEGES ON `wordpress`.* TO 'wordpress'@'%' |
+----------------------------------------------------------+
2 rows in set (0.00 sec)参考ちなみに権限を奪いたい場合は以下のようにREVOKEコマンドを実行します。GRANTとほぼ構文は同じですがTOがFROMに変わっていることに注意です。
mysql> REVOKE ALL PRIVILEGES ON wordpress.* FROM 'wordpress';
データベースから切断するときは \q を実行します。
Nginxの準備
今回は、HTTPサーバとしてNginx(エンジンエックス)を使用します。Nginxのインストール
Nginxをインストールします。
# apt install nginxNginxを起動します。
# systemctl start nginxデフォルトで自動起動も有効になっているようですね。
# systemctl status nginx
● nginx.service - A high performance web server and a reverse proxy server
   Loaded: loaded (/lib/systemd/system/nginx.service; enabled; vendor preset: enabled)
   Active: active (running) since Sat 2020-09-26 01:58:15 UTC; 6s ago
     Docs: man:nginx(8)
  Process: 6189 ExecStart=/usr/sbin/nginx -g daemon on; master_process on; (code=exited, status=0/SUCCESS)
  Process: 6188 ExecStartPre=/usr/sbin/nginx -t -q -g daemon on; master_process on; (code=exited, status=0/SUCCESS)
 Main PID: 6190 (nginx)
    Tasks: 2 (limit: 4125)
   CGroup: /system.slice/nginx.service
           ├─6190 nginx: master process /usr/sbin/nginx -g daemon on; master_process on;
           └─6191 nginx: worker process

Sep 26 01:58:15 ubuntu18 systemd[1]: Starting A high performance web server and a reverse proxy server...
Sep 26 01:58:15 ubuntu18 systemd[1]: Started A high performance web server and a reverse proxy server.
PHPの準備
PHPのインストール
WordPressはPHPで動いているので、PHPをインストールします。
# apt install php今回はPHPのPFMパッケージ版もインストールします。
# apt install php-fpm参考FPM(FastCGI Process Manager)はPHPのFastCGI実装の1つで高負荷サイト用の追加機能を提供するものです。 今回の場合は家庭内サーバなので高負荷対策というよりも、できるだけ負荷を低減させることが目的です。
PHP関連モジュールのインストール
必要なPHP関連モジュールをインストールします。
# apt -y install php-mysql php-xml php-curl php-gd php-mbstring php-readline php-bz2 php-zip php-jsonPHPの設定
php.iniファイルを開きます。
# vi /etc/php/7.2/fpm/php.ini必要に応じて以下のパラメータでアップロードできる最大ファイルサイズを引き揚げます。
upload_max_filesizeNginxとPHPの連携設定
FPM版PHPでNginxとの連携設定を行います。
/etc/nginx/sites-available/defaultファイルを開きます。
# vi /etc/nginx/sites-available/defaultWordPress専用サーバにするため、serverセクション内のrootのパスを/var/www/html/wordpress/に変更します。
root /var/www/html/;編集後)
root /var/www/html/wordpress/;また、serverセクション内の以下のコメントを解除し、fastcgi_pass行を追記します。
    # pass PHP scripts to FastCGI server
    #
    #location ~ \.php$ {
    #   include snippets/fastcgi-php.conf;
    #
    #   # With php-fpm (or other unix sockets):
    #   fastcgi_pass unix:/var/run/php/php7.0-fpm.sock;
    #   # With php-cgi (or other tcp sockets):
    #   fastcgi_pass 127.0.0.1:9000;
    #}
編集後)
    # pass PHP scripts to FastCGI server
    #
    location ~ \.php$ {
        include snippets/fastcgi-php.conf;
    #
    #   # With php-fpm (or other unix sockets):
    #   fastcgi_pass unix:/var/run/php/php7.0-fpm.sock;
        fastcgi_pass unix:/var/run/php/php7.2-fpm.sock;
    #   # With php-cgi (or other tcp sockets):
    #   fastcgi_pass 127.0.0.1:9000;
    }
これはNginxにphpファイルへのアクセスがあった場合はsnippets/fastcgi-php.confに基づき処理し、FastCGI用UNIXソケットとして/var/run/php/php7.2-fpm.sockを使用するという意味になります。
注意fastcgi_pass unix:はコメントでは/var/run/php/php7.0-fpm.sockが指定されているように、インストールされているPHPのバージョンによってパスが異なります。念のため実際にファイルが存在することを確認した方が無難です。
次にindexファイル一覧にindex.phpを追加します。 # Add index.php to the list if you are using PHP
index index.html index.htm index.nginx-debian.html;編集後)
    # Add index.php to the list if you are using PHP
    index index.html index.htm index.nginx-debian.html index.php;
設定のチェック
以下のコマンドで設定のテストが実施できます。
# nginx -t設定に問題がなければ以下が出力されるはずです。
nginx: the configuration file /etc/nginx/nginx.conf syntax is ok
nginx: configuration file /etc/nginx/nginx.conf test is successful
WordPressの準備
WordPressのインストール
/tmpに移動して、最新版(latest)のWordPressのパッケージをダウンロードします。
# cd /tmp
# wget https://ja.wordpress.org/wordpress-latest-ja.tar.gz
パッケージを展開します。
# tar zxvf wordpress-latest-ja.tar.gzwordpressディレクトリにパッケージが展開されました。
# ls | grep wordpress
wordpress
wordpress-latest-ja.tar.gz
wordpressディレクトリを/var/www/html/に移動します。
# mv wordpress /var/www/html/wordpressディレクトリへのアクセス権限の付与
nginxのワーカープロセスはwww-dataというユーザーで実行されています。
# ps -ef | grep nginx
root      6190     1  0 01:58 ?        00:00:00 nginx: master process /usr/sbin/nginx -g daemon on; master_process on;
www-data  6191  6190  0 01:58 ?        00:00:00 nginx: worker process
このため、/var/www/html/wordpressとその配下のファイルとディレクトリの所有者とグループをwww-dataに変更します。
# chown www-data:www-data /var/www/html/wordpress -R/var/www/html/wordpress内はディレクトリは755、ファイルは644のパーミッションが設定されています。参考
WordPressの設定
最後にWordPressの設定ファイルを作成および確認しておきます。 /var/www/html/wordpressに移動します。
# cd /var/www/html/wordpress初期設定ではwp-config.phpは存在しないため、サンプルとして用意されているwp-config-sample.phpを基にwp-config.phpファイルを作成します。
# cp wp-config-sample.php wp-config.phpwp-config.phpの内容を確認してみましょう。
# vi wp-config.phpここで重要になるのはデータベースとの接続設定です。
// ** MySQL 設定 - この情報はホスティング先から入手してください。 ** //
/** WordPress のためのデータベース名 */
define( 'DB_NAME', 'database_name_here' );

/** MySQL データベースのユーザー名 */
define( 'DB_USER', 'username_here' );

/** MySQL データベースのパスワード */
define( 'DB_PASSWORD', 'password_here' );
これらを先ほど設定したwordpressデータベースの接続設定と一致するように以下のように変更します。
// ** MySQL 設定 - この情報はホスティング先から入手してください。 ** //
/** WordPress のためのデータベース名 */
define( 'DB_NAME', 'wordpress' );

/** MySQL データベースのユーザー名 */
define( 'DB_USER', 'wordpress' );

/** MySQL データベースのパスワード */
define( 'DB_PASSWORD', 'wordpress' );
WordPressの初期設定
一旦、Nginxを再起動します。
# systemctl restart nginxWordPressに接続
では、WordPressに接続してみましょう。
まず、LXDコンテナにLXDホストからIPアドレスを振っている場合(デフォルト)は、ホスト以外からアクセスするためには、LXDホスト(lxdbr0インターフェースを持っているマシン)のIPアドレスをクライアント端末側でゲートウェイに設定しておきましょう。 Windows 10の場合、アダプタのプロパティ > TCP/IPv4のプロパティ > 詳細設定よりゲートウェイを追加できます。
# ip addr show dev enp0s18
2: enp0s18:  mtu 1500 qdisc fq_codel state UNKNOWN group default qlen 1000
    link/ether 00:40:d0:ac:79:b0 brd ff:ff:ff:ff:ff:ff
    inet 192.168.11.150/24 brd 192.168.11.255 scope global noprefixroute enp0s18
       valid_lft forever preferred_lft forever
    inet6 2408:210:c5c4:7e00:8c5:b501:2d7:7e0/64 scope global temporary dynamic
       valid_lft 602674sec preferred_lft 84215sec
    inet6 2408:210:c5c4:7e00:574e:e1aa:6c78:e1fb/64 scope global dynamic mngtmpaddr noprefixroute
       valid_lft 2591776sec preferred_lft 604576sec
    inet6 fe80::f5e9:b0ae:c904:65fa/64 scope link noprefixroute
valid_lft forever preferred_lft forever 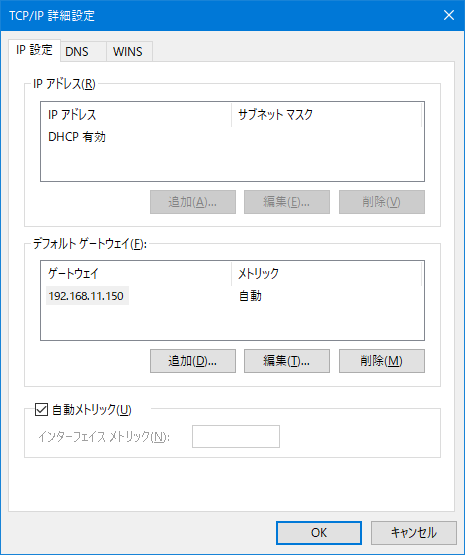
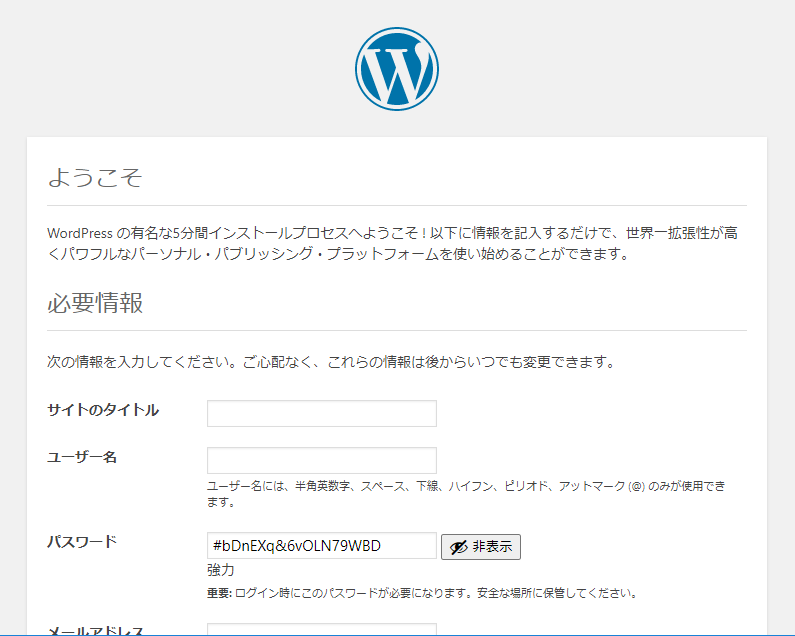
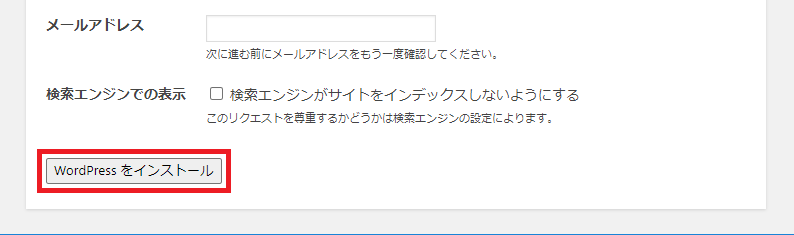
Webブラウザから以下のURLを開きます。
http://LXDホストのIP
WordPressの初期設定画面「ようこそ」ページが表示されれば成功です。
トラブルシュート
403 Forbiddenエラーになる場合
「403 Forbidden」エラーで表示されない場合、/var/log/nginx/error.logでエラーの理由を確認します。
以下では、/var/www/html/wordpress/のインデックスへのアクセス権がない旨が出力されています。 Nginxの設定でindexにindex.phpが追加されているか、/var/www/html/wordpress/のパーミッションに問題がないか等を確認しましょう。
2020/09/26 03:07:53 [error] 12779#12779: *3 directory index of "/var/www/html/wordpress/" is forbidden, client: 192.168.11.26, server: _, request: "GET / HTTP/1.1", host: "10.188.125.68"「お使いのサーバーの PHP では WordPress に必要な MySQL 拡張を利用できないようです。」が表示される場合

php-mysqlパッケージがインストールされているかを確認しましょう。
# apt list php-mysql
Listing... Done
php-mysql/bionic,now 1:7.2+60ubuntu1 all [installed]
以上、LXD+Ubuntu+Wordpressで家庭内ブログサーバを構築してみたでした。
公開日:2020年09月26日
最終更新日:2022年02月18日
